Ubuntu 22.04 Fingerprint with Lenovo t460s

Erstelle eine Datei libfprint.list mit folgendem Inhalt:

sudo vi /etc/apt/sources.list.d/libfprint.list

deb http://ppa.launchpad.net/3v1n0/libfprint-vfs0090/ubuntu focal main
deb-src http://ppa.launchpad.net/3v1n0/libfprint-vfs0090/ubuntu focal main

Jetzt braucht man noch die libssl-1.1, diese mit dpkg installieren

wget http://archive.ubuntu.com/ubuntu/pool/main/o/openssl/libssl1.1_1.1.1-1ubuntu2.1~18.04.20_amd64.deb

sudo dpkg -i libssl1.1_1.1.1-1ubuntu2.1~18.04.20_amd64.deb

Um das Fingerprint-Modul zu laden und zu testen installieren wir aus dem Snap folgendes:

sudo snap install validity-sensors-tools
sudo snap connect validity-sensors-tools:raw-usb
sudo snap connect validity-sensors-tools:hardware-observe
sudo validity-sensors-tools.initializer
sudo validity-sensors-tools.led-test

Die Vorbereitungen sind damit abgeschlossen und wir installieren das Fingerprint-Paket:

sudo apt update
sudo apt install libfprint-2-tod-vfs0090 libpam-fprintd 

Testen und Finger scannen:

fprintd-enroll
fprintd-verify
Using device /net/reactivated/Fprint/Device/0
Listing enrolled fingers:
 - #0: right-index-finger
Verify started!
Verifying: right-index-finger
Verify result: verify-no-match (done)

Der Finger wurde für die Anmeldung des aktuell angemeldeten Benutzer registriert und man sich nun mit dem Fingerabdruck anmelden.

K/Ubuntu 20.04 Howto fix Powershell 7.1 PSSession

Auf der Microsoft Doc Webseite wird man schnell fündig wie man unter Ubuntu 20.04 die aktuelle Powershell installiert. Anbei der Link Powershell under Linux.

cd Downloads/
sudo apt update
sudo apt install -y wget apt-transport-https software-properties-common
wget -q https://packages.microsoft.com/config/ubuntu/20.04/packages-microsoft-prod.deb
sudo dpkg -i packages-microsoft-prod.deb
sudo apt-get update
sudo add-apt-repository universe
sudo apt-get install -y powershell
pwsh
PowerShell 7.1.0
Copyright (c) Microsoft Corporation.
https://aka.ms/powershell
Type 'help' to get help.
PS /home/k3ops/Downloads>

Enter-PSSession

Powershell installiert und gestartet, versucht man eine Remoteverbindung über die Powershell mit z.B. Enter-PSSession herzustellen, hagelt es gleich einmal den folgenden Fehler.

PS /home/k3ops/Downloads> Enter-PSSession -ComputerName ipadresse
Enter-PSSession: This parameter set requires WSMan, and no supported
WSMan client library was found. WSMan is either not installed or
unavailable for this system.

Howto Fix

Exit und zurück zur Bash um mittels ldd die Abhängigkeiten zu prüfen.

ldd /opt/microsoft/powershell/7/libmi.so
   linux-vdso.so.1 (0x00007fff9617c000)
   libpthread.so.0 => /lib/x86_64-linux-gnu/libpthread.so.0 (0x00007f2a180a2000)
   libdl.so.2 => /lib/x86_64-linux-gnu/libdl.so.2 (0x00007f2a1809c000)
   libpam.so.0 => /lib/x86_64-linux-gnu/libpam.so.0 (0x00007f2a1808a000)
   libssl.so.1.0.0 => not found
   libcrypto.so.1.0.0 => not found
   libc.so.6 => /lib/x86_64-linux-gnu/libc.so.6 (0x00007f2a17e98000)
   /lib64/ld-linux-x86-64.so.2 (0x00007f2a182ad000)
   libaudit.so.1 => /lib/x86_64-linux-gnu/libaudit.so.1 (0x00007f2a17e6a000)
   libcap-ng.so.0 => /lib/x86_64-linux-gnu/libcap-ng.so.0 (0x00007f2a17e62000)

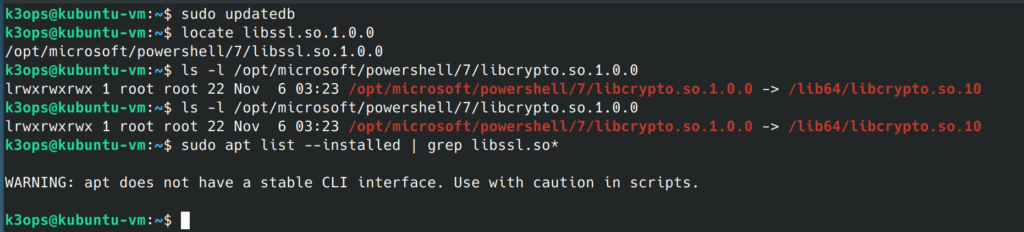
Libssl.so.1.0.0 und libcrypto werden nicht gefunden, um sich das genauer anzuschauen installieren wir schnell noch mlocate und lassen uns mit locate den Ort anzeigen wo sich die libssl.so.1.0.0 befindet.

sudo apt install mlocate
sudo updatedb
locate libssl.so.1.0.0
 /opt/microsoft/powershell/7/libssl.so.1.0.0
 /snap/core18/1880/usr/lib/x86_64-linux-gnu/libssl.so.1.0.0

Unter /opt/microsoft/powershell wird uns eine libssl.so.1.0.0 angezeigt, jedoch wenn man dies weiter prüft sieht man das dies nur ein Softlink ist der auf eine libssl.so.10 zeigt die garnicht vorhanden ist ! Es ist auch keine libssl unter einem frischen Ubuntu 20.04 installiert und anscheinend wird die Abhängigkeit auch garnicht mitinstalliert, obwohl das Powershell-Paket über die Repos installiert wurde.

Installieren der libssl.so und der libcrypto.so

sudo apt install libssl-dev
sudo apt list --installed | grep libssl*
 WARNING: apt does not have a stable CLI interface. Use with caution in scripts.
 libss2/focal,now 1.45.5-2ubuntu1 amd64  [Installiert,automatisch]
 libssh-4/focal-updates,focal-security,now 0.9.3-2ubuntu2.1 amd64  [Installiert,automatisch]
 libssh-gcrypt-4/focal-updates,focal-security,now 0.9.3-2ubuntu2.1 amd64  [Installiert,automatisch]
 libssl-dev/focal-updates,focal-security,now 1.1.1f-1ubuntu2.1 amd64  [installiert]
 libssl1.1/focal-updates,focal-security,now 1.1.1f-1ubuntu2.1 amd64  [Installiert,automatisch]
locate libssl.so.1.1
 /snap/core18/1880/usr/lib/x86_64-linux-gnu/libssl.so.1.1
 /snap/gnome-3-34-1804/36/usr/lib/x86_64-linux-gnu/libssl.so.1.1
 /usr/lib/x86_64-linux-gnu/libssl.so.1.1

K/Ubuntu 20.04 installiert die Version libssl.so.1.1 und zu finden ist die unter /usr/lib/x86_64-linux-gnu/. Nun setzt man einfach die entsprechenden Softlinks in das Verzeichnis wo ldd ein paar Schritte weiter oben die Datei sucht, nämlich unter /lib/x86_64-linux-gnu. Achtung wir setzen die Softlinks auf den Namen der gesuchten library also nicht XXX.so.1.1 sondern auf XXX.so.1.0.0.

Softlinks erstellen

sudo ln -s /usr/lib/x86_64-linux-gnu/libssl.so.1.1 /lib/x86_64-linux-gnu/libssl.so.1.0.0
sudo ln -s /usr/lib/x86_64-linux-gnu/libcrypto.so.1.1 /lib/x86_64-linux-gnu/libcrypto.so.1.0.0

ldd /opt/microsoft/powershell/7/libmi.so
   linux-vdso.so.1 (0x00007ffe02b7c000)
   libpthread.so.0 => /lib/x86_64-linux-gnu/libpthread.so.0 (0x00007fe1090c7000)
   libdl.so.2 => /lib/x86_64-linux-gnu/libdl.so.2 (0x00007fe1090c1000)
   libpam.so.0 => /lib/x86_64-linux-gnu/libpam.so.0 (0x00007fe1090af000)
   libssl.so.1.0.0 => /lib/x86_64-linux-gnu/libssl.so.1.0.0 (0x00007fe10901c000)
   libcrypto.so.1.0.0 => /lib/x86_64-linux-gnu/libcrypto.so.1.0.0 (0x00007fe108d46000)
   libc.so.6 => /lib/x86_64-linux-gnu/libc.so.6 (0x00007fe108b54000)
   /lib64/ld-linux-x86-64.so.2 (0x00007fe1092d2000)
   libaudit.so.1 => /lib/x86_64-linux-gnu/libaudit.so.1 (0x00007fe108b26000)
   libcap-ng.so.0 => /lib/x86_64-linux-gnu/libcap-ng.so.0 (0x00007fe108b1e000)

Installieren GSS-NTLMSSP

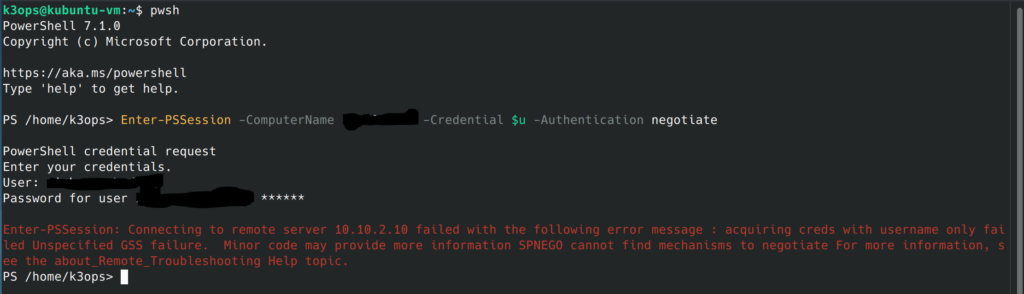
Nachdem ldd alle Librarys findet tritt ein weitere Fehler bei dem Enter-PSSession Befehl auf.

Hier muss gss-ntlmssp noch installiert werden.

apt install gss-ntlmssp

Enter-PSSession

Jetzt kann man sich wieder Remote mit der Powershell eines Windows Gerätes verbinden wenn die Verbindung in der Windows-Firewall freigegeben wurde. Zu beachten ist das „-Authentication negotiate“ verwendet wird.

k3ops@kubuntu-vm:~$ pwsh
 PowerShell 7.1.0
 Copyright (c) Microsoft Corporation.
 https://aka.ms/powershell
 Type 'help' to get help.
 PS /home/k3ops> Enter-PSSession -ComputerName 10.10.2.10 -Credential $u -Authentication negotiate
 PowerShell credential request
 Enter your credentials.
 User: DOMAIN\username
 Password for user DOMAIN\username: XXXXXX 
 [XXX.XXX.XXX.XXX]: PS C:\Users\k3ops\Documents> cd ..
 [XXX.XXX.XXX.XXX]: PS C:\Users\k3ops> cd ..
 [XXX.XXX.XXX.XXX]: PS C:\Users> cd ..
 [XXX.XXX.XXX.XXX]: PS C:> ls
 Verzeichnis: C:\
 Mode                LastWriteTime         Length Name                                                                                  
 ----                -------------         ------ ----                                                                                  
 d-----       01.08.2019     15:49                Intel                                                                                 
 d-----       12.09.2016     13:35                Logs                                                                                  
 d-----       01.08.2019     16:59                OEM                                                                                   
 d-----       02.08.2019     11:53                PerfLogs                                                                              
 da----       05.04.2020     16:23                PostInstall                                                                           
 d-r---       28.02.2020     11:12                Program Files                                                                         
 d-----       31.08.2020     10:21                Program Files (x86)                                                                   
 d-----       10.12.2020     23:58                tmp                                                                                   
 d-r---       16.12.2020     14:12                Users                                                                                 
 d-----       16.12.2020     11:49                Windows                                                                               
 d-----       14.08.2019     10:56                _Scripts                                                                              
 -a----       12.02.2020     12:11           1024 .rnd                                                                                  
 -a----       19.11.2020     15:14             25 log.txt                                                                               
 -a----       01.08.2019     16:59              0 SVIMSP_OLD
[XXX.XXX.XXX.XXX]: PS C:> 

Ubuntu 20.04 VM HighDPI Einstellung

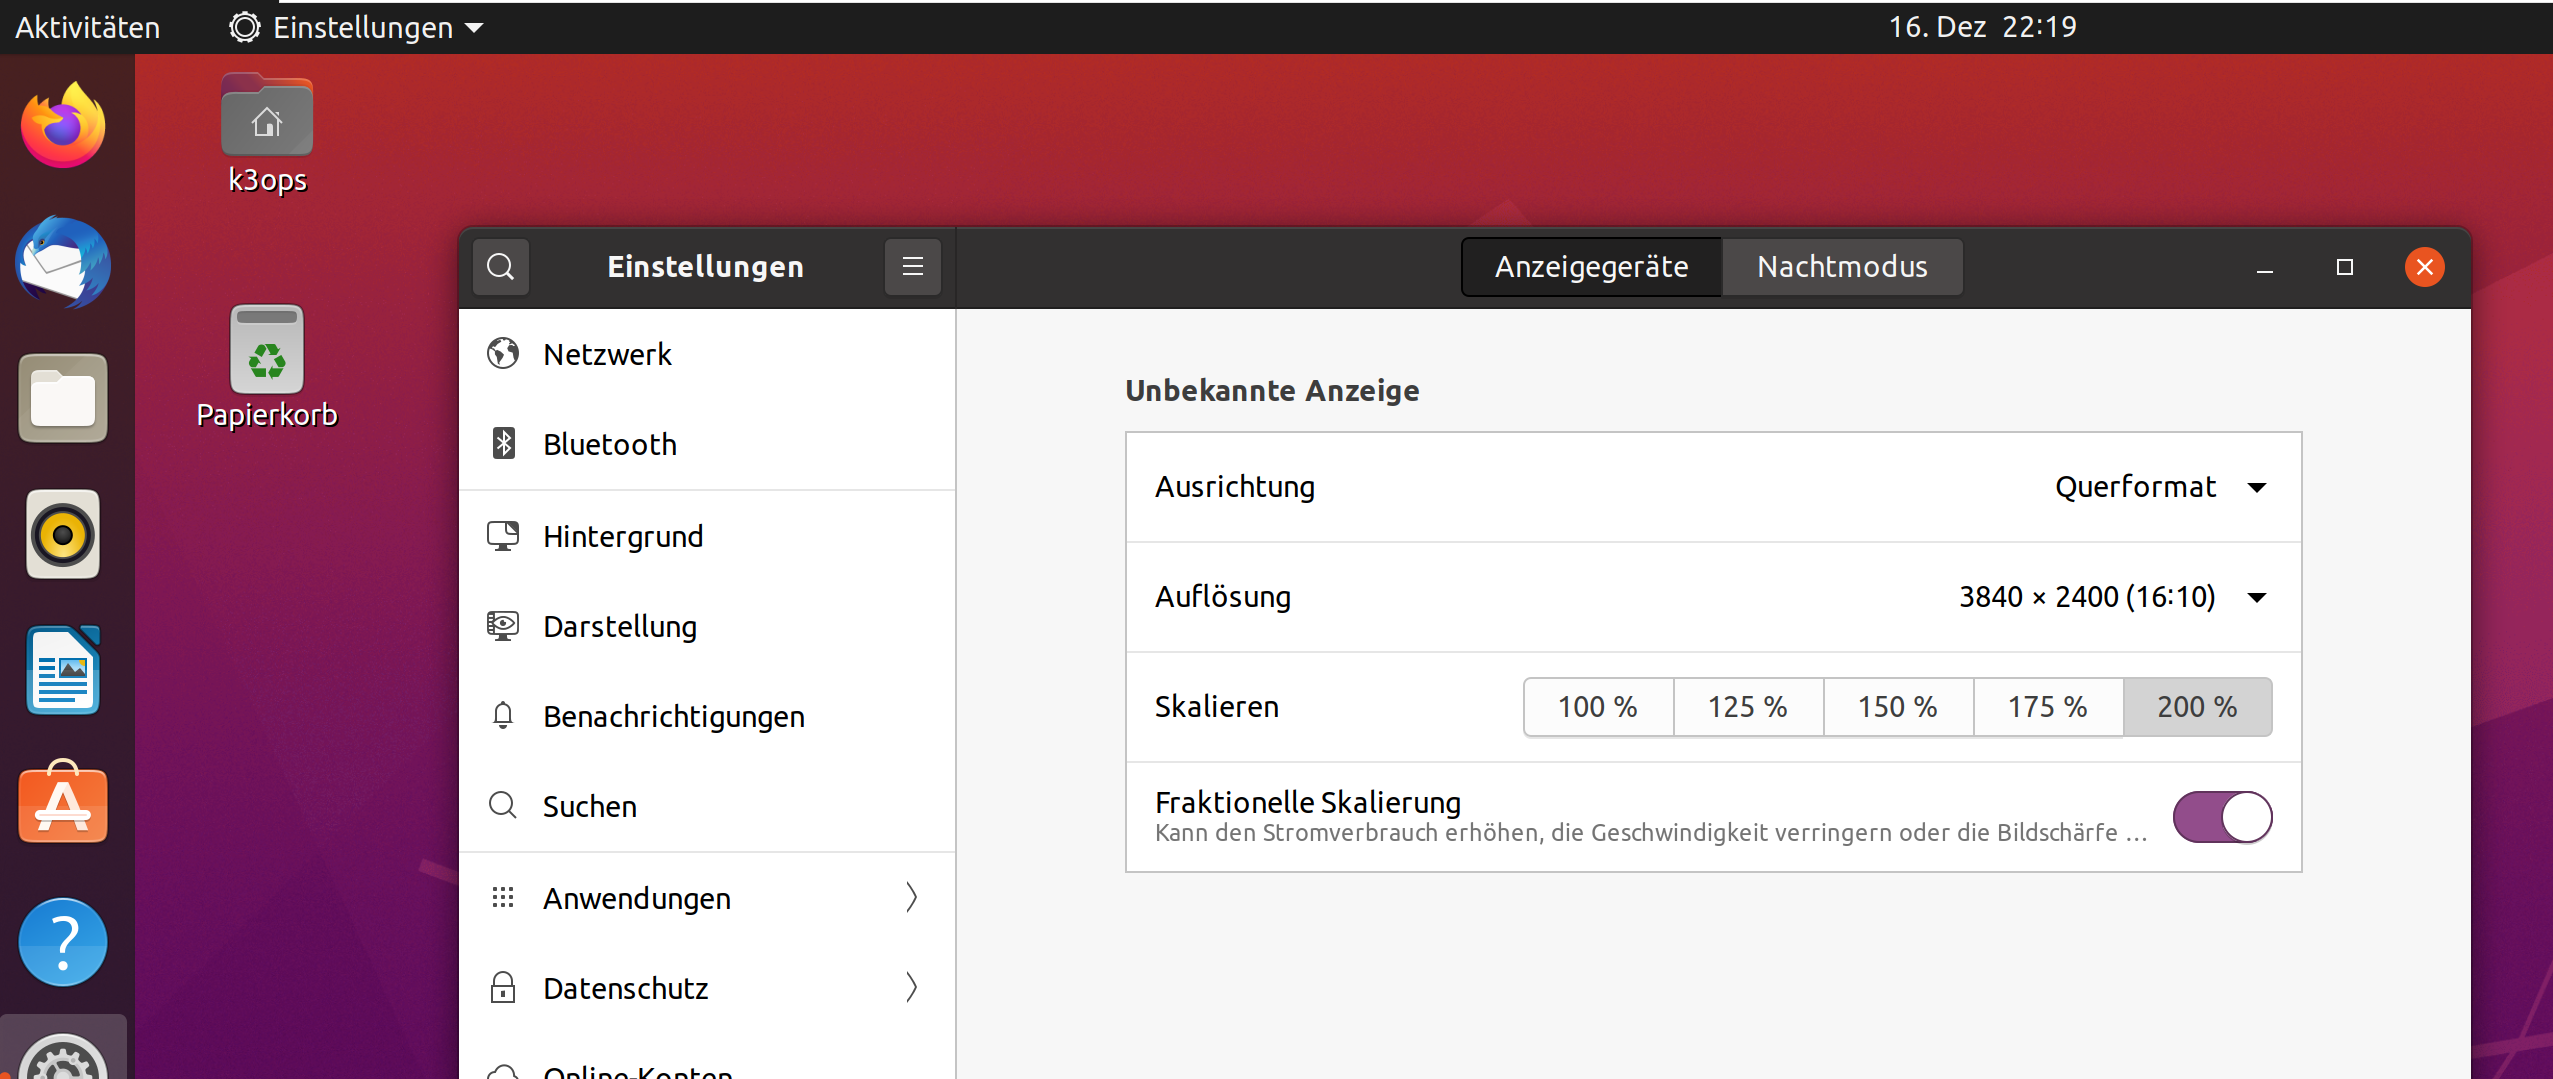
Unter Windows 10 mit einem HighDPI Display mussten wir in der Vergangenheit in einer VM mit Ubuntu meist gsettings bearbeiten bzw anpassen. Mit Ubuntu ist das nicht mehr nötig, es kommt von Haus aus mit „Fraktionelle Skalierung“. Nachdem die Option aber je nach virtueller Display Einstellung ein oder ausgeblendet ist zeige ich folgend wie ich dabei vorging.

Nach erfolgreicher Anmeldung am System stellt ihr die VM in der VM Workstation auf Vollbild. (Enter full screen mode) Im Anschluss öffnet man Einstellungen -> Anzeigegeräte und aktiviert Fraktionelle Skalierung. Für mich habe ich 200% unter „Skalieren“ gewählt und angewendet.

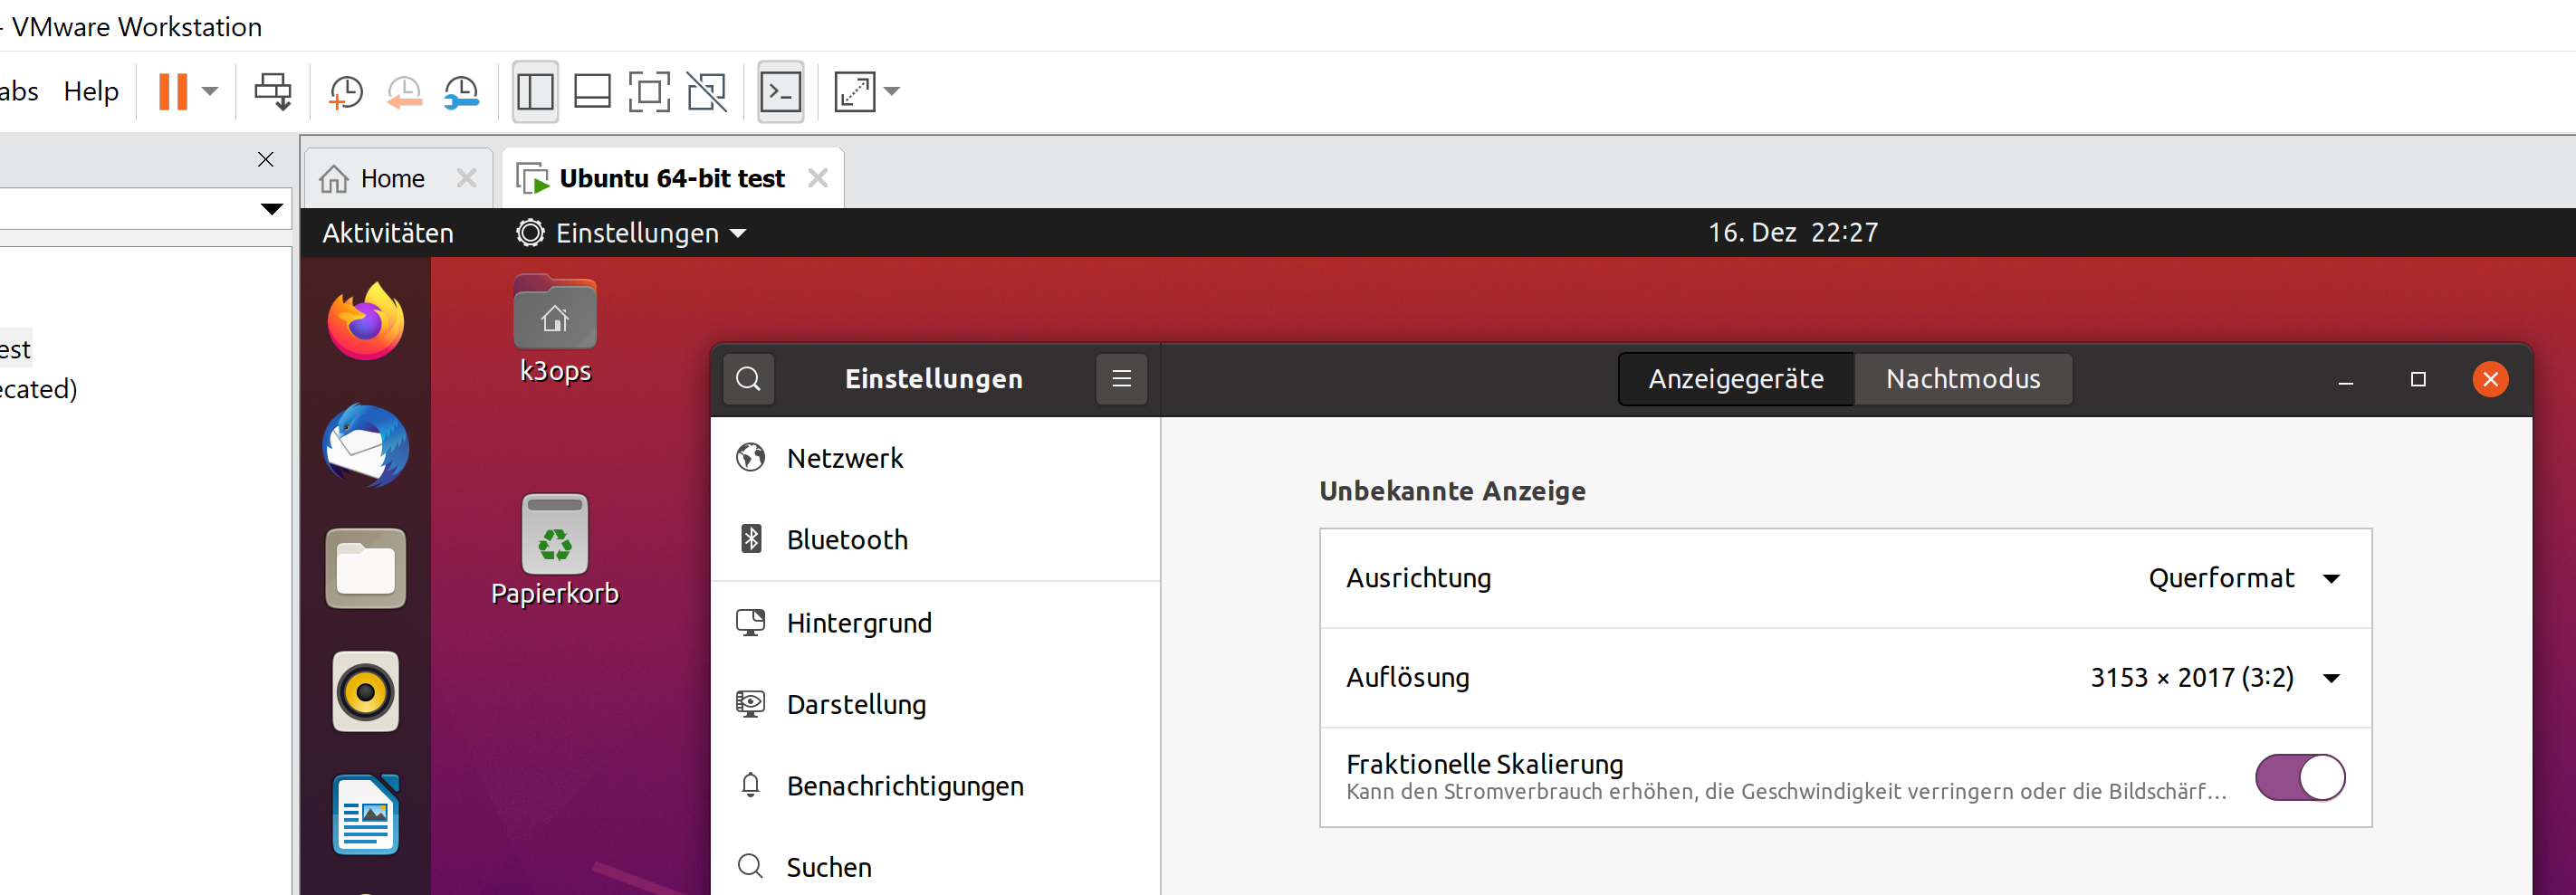
Im Anschluss kann wieder auf den Fenstermodus umgestellt werden. Hier bleibt dann die Fraktionelle Skalierung erhalten. Wie bereits oben geschrieben wenn man sich im Fenster-Modus befindet und hier keine gängige Bildschirmauflösung hat wird „Skalieren“ nicht angezeigt aber Fraktionelle Skalierung bleibt aktiv.

So kann man dann gut arbeiten bzw die VM auch auf einen 2. Monitor verschieben und relativ easy zwischen mehreren VM`s durchklicken wenn einem Tastenkombinationen zu Oldschool sind… Ich hoffe das hilft dem ein oder anderen weiter.

Ubuntu 18.04 Skalierung unter VM-Workstation anpassen (HighDPI)

Skalierung Desktop anpassen

gsettings set org.gnome.desktop.interface scaling-factor 2

Skalierung Anmeldebildschirm anpassen

In der folgenden Datei den Standardwert auf 2 abändern

sudo vi /usr/share/glib-2.0/schemas/org.gnome.desktop.interface.gschema.xml
<key name="scaling-factor" type="u">
<default>2</default>
<summary>Window scaling factor</summary>
<description>
Integer factor used to scale windows by. For use on high-dpi screens.
0 means pick automatically based on monitor.
</description>
</key>

Anzeigeschema neu einlesen

sudo glib-compile-schemas /usr/share/glib-2.0/schemas

Scrollbalken + Pfeile

Erstelle eine Datei gtk.css unter ~/.config/gtk-3.0 mit folgendem Inhalt:

scrollbar {
    -GtkScrollbar-has-backward-stepper: 1;
    -GtkScrollbar-has-forward-stepper: 1;
}

scrollbar slider {
    /* Size of the slider */
    min-width: 12px;
    min-height: 12px;
    border-radius: 22px;

    /* Padding around the slider */
    border: 5px solid transparent;
}

native SSH in der Powershell oder unter CMD verwenden

Powershell Execution Policy muss auf AllSigned oder bypass gestellt werden.
Das install.ps1 script kann ebenfalls vorher angeschaut werden was hier auf dem System gemacht wird.

Chocolatey installieren

PS C:\WINDOWS\system32> Set-ExecutionPolicy AllSigned; iex ((New-Object System.Net.WebClient).DownloadString('https://chocolatey.org/install.ps1'))

Installation von choco prüfen
PS C:\WINDOWS\system32> choco
Chocolatey v0.10.7
Please run 'choco -?' or 'choco -?' for help menu.

Git für Windows herunterladen
PS C:\WINDOWS\system32> choco install git -params "/GitAndUnixToolsOnPath"

check_mysql_health unter Ubuntu 16.04 (Icinga2)

Download, kompilieren, installieren

wget https://labs.consol.de/assets/downloads/nagios/check_mysql_health-2.2.2.tar.gz
tar xfz check_mysql_health-2.2.2.tar.gz
cd check_mysl_health
./configure
make 
make install

Benötigte Pakete

apt install libdbi-perl
apt install libdbd-mysql-perl

Check testen

root@icinga2:/usr/lib/nagios/plugins# ./check_mysql_health -H 127.0.0.1 --user 'username' --password 'password' --mode threads-connected
OK - 7 client connection threads | threads_connected=7;10;20

Bandbreitennutzung mittels MRTG überwachen

Überwachung der Bandbreite vom Lokalen Host

MRTG installieren

root@suffix:~# aptitude install apache2 mrtg
root@suffix:~# mkdir /etc/mrtg && sudo mv /etc/mrtg.cfg /etc/mrtg
root@suffix:~# mkdir /var/www/mrtg


Bevor nun MRTG zum 1. Mal gestartet wird muss der SNMP-Daemon noch installiert und konfiguriert werden

root@suffix:~# aptitude install snmp snmpd


In der Konfigurationdatei /etc/default/snmp sollte Zeile 12 durch folgende Zeile ausgetauscht werden.

SNMPDOPTS='-Lsd -Lf /dev/null -u snmp -I -smux -p /var/run/snmpd.pid -c /etc/snmp/snmpd.conf'
root@suffix:~# cat /etc/default/snmp
1 # This file controls the activity of snmpd and snmptrapd
2
3 # Don't load any MIBs by default.
4 # You might comment this lines once you have the MIBs downloaded.
5 export MIBS=
6
7 # snmpd control (yes means start daemon).
8 SNMPDRUN=yes
9
10 # snmpd options (use syslog, close stdin/out/err).
11 #SNMPDOPTS='-Lsd -Lf /dev/null -u snmp -g snmp -I -smux -p /var/run/snmpd.pid'
12 SNMPDOPTS='-Lsd -Lf /dev/null -u snmp -I -smux -p /var/run/snmpd.pid -c /etc/snmp/snmpd.conf'


Eine simple Konfiguration von /etc/snmp/snmpd.conf (Für diesen Zweck ausreichend!)

root@suffix:~# cat /etc/snmp/snmpd.conf
rocommunity    public   
sysLocation    Keller
sysContact     k3ops


SNMP-Daemon neustarten

root@suffix:~# service snmpd restart (oder /etc/init.d/snmpd restart)


Abschlusskonfiguration MRTG

root@suffix:~# cfgmaker --output=/etc/mrtg/localhost.cfg public@127.0.0.1
--base: Get Device Info on public@127.0.0.1: --base: Vendor Id: Unknown Vendor - 1.3.6.1.4.1.8072.3.2.10 --base: Populating confcache --base: Get Interface Info --base: Walking ifIndex --snpd: public@127.0.0.1: -> 1 -> ifIndex = 1 --snpd: public@127.0.0.1: -> 2 -> ifIndex = 2 --base: Walking ifType --snpd: public@127.0.0.1: -> 1 -> ifType = 24 --snpd: public@127.0.0.1: -> 2 -> ifType = 6 --base: Walking ifAdminStatus --snpd: public@127.0.0.1: -> 1 -> ifAdminStatus = 1 --snpd: public@127.0.0.1: -> 2 -> ifAdminStatus = 1 --base: Walking ifOperStatus --snpd: public@127.0.0.1: -> 1 -> ifOperStatus = 1 --snpd: public@127.0.0.1: -> 2 -> ifOperStatus = 1 --base: Walking ifMtu --snpd: public@127.0.0.1: -> 1 -> ifMtu = 16436 --snpd: public@127.0.0.1: -> 2 -> ifMtu = 1500 --base: Walking ifSpeed --snpd: public@127.0.0.1: -> 1 -> ifSpeed = 10000000 --snpd: public@127.0.0.1: -> 2 -> ifSpeed = 100000000 --base: Writing /etc/mrtg/localhost.cfg


Die #Global Settings werden in der /etc/mrtg/localhost.cfg folgend angepasst

root@suffix:~# cat /etc/mrtg/localhost.cfg
#Global Settings
RunAsDaemon: yes
EnableIPv6: no
WorkDir: /var/www/mrtg
Options[_]: bits,growright
WriteExpires: Yes
### Interface 1 >> Descr: 'lo' | Name: 'lo' | Ip: '127.0.0.1' | Eth: 'No Ethernet Id' ###
### The following interface is commented out because:
...
Target[127.0.0.1_eth0]: #eth0:public@127.0.0.1:
SetEnv[127.0.0.1_eth0]: MRTG_INT_IP="192.168.XXX.XXX" MRTG_INT_DESCR="eth0"
MaxBytes[127.0.0.1_eth0]: 12500000
Title[127.0.0.1_eth0]: Traffic Analysis for eth0 -- suffix
...


MRTG starten und Bandbreiten Status Webseite erzeugen

root@suffix:~# env LANG=C /usr/bin/mrtg /etc/mrtg/localhost.cfg

Es kann sein dass beim Starten von MRTG von Ubuntu gemecket wird dass /var/www/mrtg nicht existiert… einfach von Hand erstellen und mrtg erneut starten

root@suffix:~# indexmaker --output=/var/www/mrtg/index.html /etc/mrtg/localhost.cfg


MRTG process prüfen

root@suffix:~# ps ax | grep mrtg
11814 ? Ss 0:00 /usr/bin/perl -w /usr/bin/mrtg /etc/mrtg/localhost.cfg 25979 pts/0 R+ 0:00 grep --color=auto mrtg 

MRTG Process stoppen

root@suffix:~# kill 11814


Unter http://IP/mrtg kann die so eben erzeugte index.htm im Browser aufgerufen werden.